

Disclaimer: This is not a professional piece of article to share about the camera knowledge, but what I have learnt on that day. Also, the information here is very specific to Sony Alpha Camera , like where to find the 'white balance' in camera setting and so on.
Auto Setting
This is what I learnt from my friend. Basically, under Auto setting you can still adjust certain setting that is found in Manual Setting too.

Focus >>> Aperture
Brightness >>> EXPOSURE COMP
Temperature Colour >>> White Balance
Vividness >>> Sharpness (Under creative style)
Picture effect >>> Creative style (to adjust Saturation and Contrast)
This is also where you can adjust your photo to be black&white, sepia.
Available under Manual setting (Aperture, Shutterspeed, Programme, but not Auto setting)

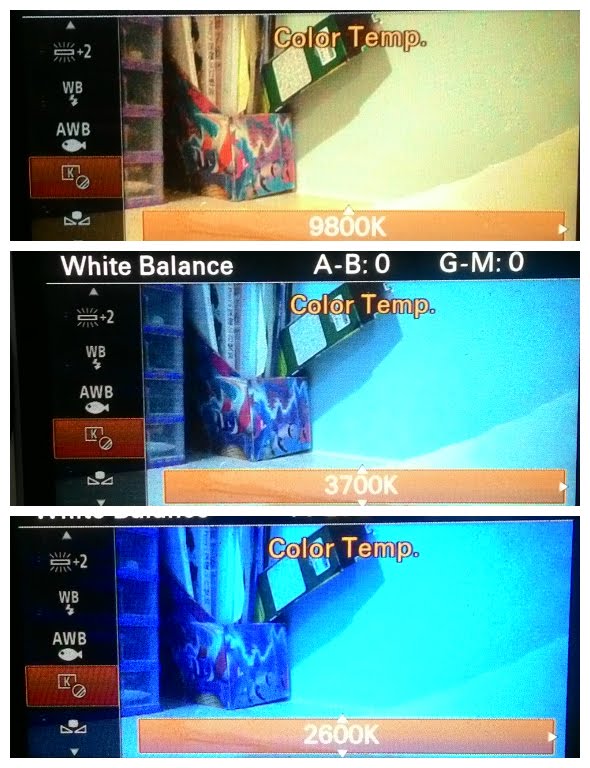
It's either hot or cold as you can see here.
Higher value (eg. 9800 K) >>> Hot colour
Lower value (eg. 3700K) >>> Cold colour
1a. White Balance: Preset button
Also, sometime, if you cannot decided which colour temperature is the best to showcase your photo, you let the camera to decide for you MANUALLY. Weird,right? Let's see how it goes...
Also found under the tab WHITE BALANCE, you can go to CUSTOM SETUP, and let the camera to decide which temperature colour suit the photo the most considering the colour of light source, colour of background, and the colour of object display.


2. Creative style
Adjustment on contrast, saturation and the sharpness.


Alternatively, if you are on Auto mode (aka intelligent mode, you can still adjust the vividness of the colour ) by clicking the bottom of the button.
3. Shadow vs Reflective board
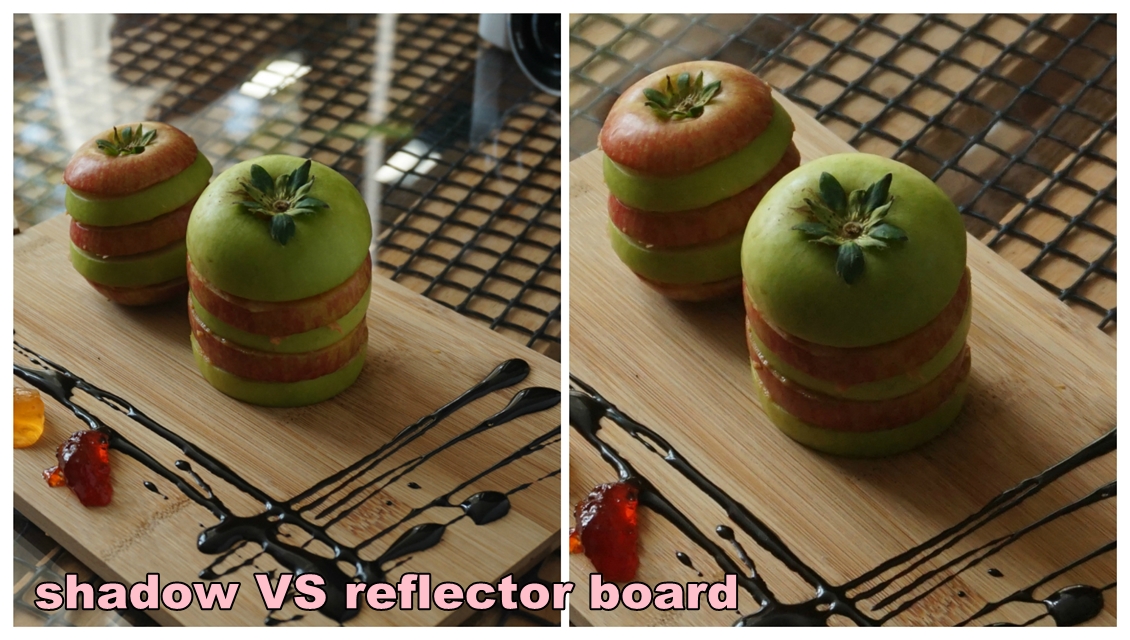
LEFT: lighter shadow
RIGHT: Darker shadow
the MAGIC: use a reflectivor board/ any white colour flat surface like notebook, A4 paper to reflect the natural light back to the object. You should place the reflector opposite the direction of the natural light (of course, this is also where the shadow formed! )
4. Smart Remote Embedded
Take photo/record video in distance
I have known this feature earlier, but I seldom use this feature. One problem connecting the camera to my phone is that ..in my case, my phone disconnect easily. Hence I am quite frustrated. Anyway, this is a useful features especially when you want to shoot from distance without anyone available to help.
5a. Focus on the object that I wanted
Focus on it until a green box appear, showing that the object has been focused, then position your camera/image sensor to anyway you want to include as the background. The object of focus could be in middle,side. As long as the object has been focused earlier.
5b. Focus area(Centre/Wide)

As the word indicate, you can either focus on Centre or Wide. there were still other Focus option available, but I learnt only these 2 features mainly, hence has more understand regarding the 2 options only. Well, you can explore the rest of the Focus Area option yourself after you understand the either of the features here,right?
FOCUS AREA: CENTRE
The lens will focus the object in the centre. However, this doesnt means that the object that is not in the centre will be blur out. This feature is suitable when you know you need to aim the object in the center of the photo, combining with aperture, than the outcome would be high degree of center + background blur out.

Now only I realise why is it some screen will always display all this icon, which I do not know what is meaning initially.
FOCUS AREA: WIDE
Whereas for WIDE, you can see the area might not be necessary all the area, it depend how you position your camera too. It goes like...

6. Selfie by smiling.


This is one of the photo I took using Smiling setting. Meaning, you no need press the shutter button but to smile/grin for the photo to be taken.
7. Dark : Exposure composition
Hence exposure composition will do this job.

8. Rule of Thirds

9. Aperture

I always get confused on the number of Aperture. According to google, it means the amount of light entering the image sensor. And one of the Sony crew taught me to remember it in this way. Imaging the number is the number of people in a photo. The higher the number, the more people will come into focus. Converselly, the lower the number, the less people will come into focus. Following this logic, you can deduce the that F3.5 will allow only small area will come into focus. Hence it tend to has higher background defocus (or shallow depth of field)
Whereas for the TOP photo, it was shoot with apeture F18, it should have everything come in focus. But perhaps because of my skill or the light, it turn out that only the right side of the photo is come into focus. You can always refer here for other comparison of aperture photo.
12. Background Defocus
- High zoom in power will enhance the background defocus
-Aperture
-Background defocus setting
Some of the photos from the event day.


No comments:
Post a Comment
Thanks for your comment! <3 <3
I really motivated when I saw people do read and make effort to comment everytime! TQ!